Table of contents
- Application Views
- Data Input View
- Layout
- The basics
- How CG-calculation is done
- Input buttons
- CG Graph View
- Tail No’s View
- Missions View
- Settings View
- How-To View
- About View
Application views
The QuickCG: Air Operators version consists of the following views:
- Data Input View – The main view for CG data input.
- CG Graph View – Shows graphs with Longitudinal and Latereral CG.
- Tail No’s View – Lists saved tail numbers and their CG data.
- Missions View – Lists saved missions and their data. View, mail or print Load Sheet reports.
- Settings View – Settings.
- How-To View – The manual.
- About View.
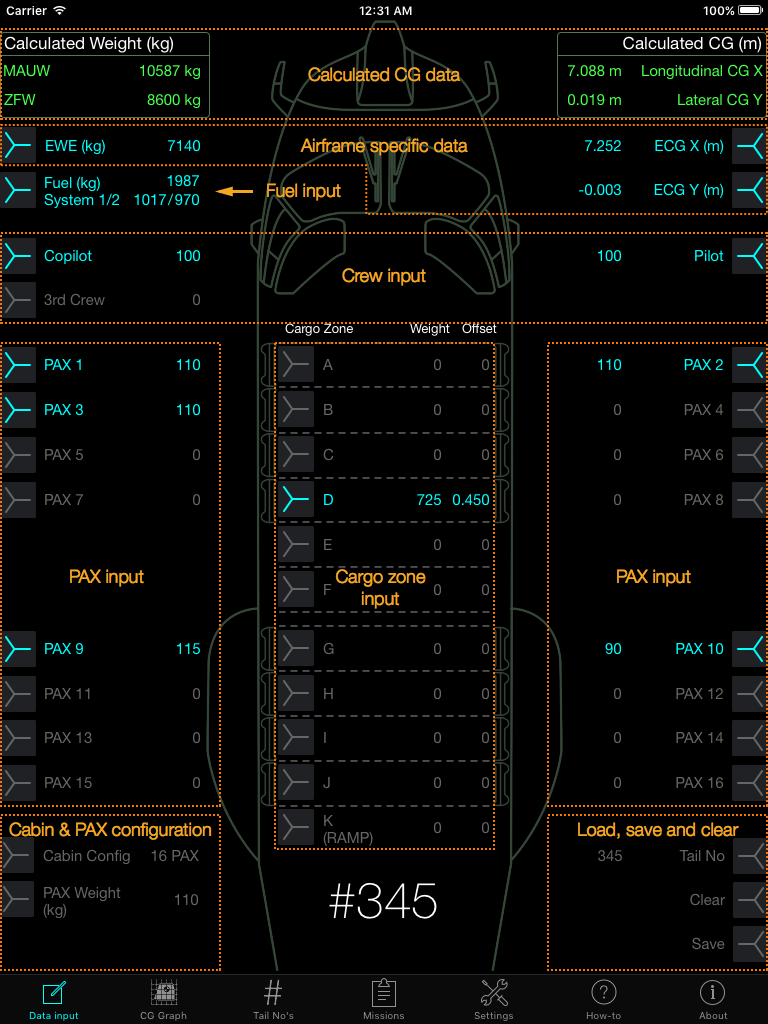
Data Input View
This is the main view, used for input of all values needed for the weight and balance calculation. The data input view will also give immediate indication by color coding if any of MAUW, ZFW or CG is exceeding the limits.
Layout
The basics
A click on a button will in most cases input a default value. A long press, 0.3 seconds or longer, will in most cases open a numpad for custom input. To close the numpad, either press the [ENT] button on the numpad, or just tap the screen anywhere outside the numpad. To clear a value, click on the button.
A long press on most labels/text will open a popup with a description for the button or label, for example, the label Fuel (kg) to the right of the [Fuel] button. To close a popup, tap anywhere on the screen.
Units used is Meter (m) and Kilogram (kg). Enter Meter as Millimeter, without comma sign.
How CG-calculation is done
- Do either of the following:
- Load a previous saved tail number with [Tail No].
- Input [EWE], [ECG X] and [ECG Y] for the actual airframe and choose a [Cabin Config], available cabin configurations is 14,16 or 20 seats. Optional: Input tail number with [Tail no] and save tail no with a long press on [Tail no].
- Input fuel mass, fuel at take off, use the [Fuel] button.
- If needed, adjust the weight of pilots and add cabin crew at appropriate position (Crew at any pax seat will be called PAX). A click clears or sets default Crew Weight. Long press opens numpad for manual input.
- Input passenger with [PAX] buttons. A click on a PAX button inputs weight set by PAX Weight button. If a PAX weight other than the default is to be used, a long press opens the numpad for individual input.
- Input cargo weight at appropriate cargo zone with [A] to [K] buttons. Input of weight only: enables calculation with cargo at lateral center. [LAT] + [L] or [R]: enables calculation of cargo on offset lateral position.
- Calculated values for ZFW, MAUW and Longitudinal + Lateral CG at MAUW is found at the top of the Data Input view, and updates continuously during the input of any value. If the calculated value is within limit it is colored green. When outside the limitations it will shift to amber or red:
- Check CG-Limits in CG Graph view. The dotted line between MAUW and ZFW shows the change in Gross Weight and CG during fuel burn. Important: The dotted CG line assumes proper fuel balance management (i.e. fuel transfer after take off).
Input buttons
EWE
Opens numpad for input. It is the responsibility of the operator to know the EWE for the actual airframe. Min input 6000 kg. (Might be found in DKU: STP—> WEIGHT MNGT —> WEIGHT AND BALANCE)
ECG X
Opens numpad for input. It is the responsibility of the operator to know the ECG X for the actual airframe. (Might be found in DKU: STP—> WEIGHT MNGT —> WEIGHT AND BALANCE)
ECG Y
Opens numpad for input. It is the responsibility of the operator to know the ECG Y for the actual airframe. The ECG Y need input of direction, i.e. Left or Right via the [L] or [R] buttons on the numpad. Left is shown as a negative value, right is shown as a positive value. (ECG Y is not found in DKU).
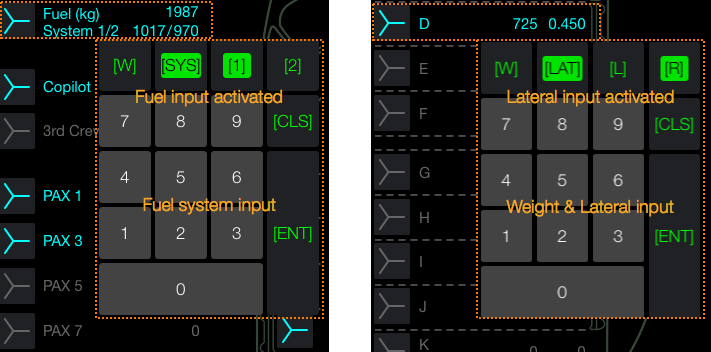
Fuel
A click opens numpad for input or clears fuel input. Long press opens numpad without clearing current input. Input of total fuel mass is recommended during preplanning of a mission. Fuel balance is calculated automatically. If fuel balance is known it is possible to increase the accuracy of the calculation by entering the actual fuel mass for each system. [SYS] + [1] or [2] enables input of fuel for fuel system 1 or 2.
Pilot, Copilot and 3rd Crew
A click inputs default Crew Weight, a long press opens the numpad for manual input. To change Default Crew Weight, see Settings View.
PAX
A click inputs weight set by PAX Weight button. A long press opens numpad for manual input for the specific PAX. To change Default PAX Weight, see Settings View.
PAX Weight
If standard PAX Weight other than default PAX Weight is to be used, PAX Weight button opens numpad for custom input. When weight is set to other then default PAX Weight, a click resets to default PAX Weight. To change Default PAX Weight, see Settings View.
Cargo Zones A to K
Opens numpad for input of weight and the lateral offset. The offset defaults to the center of the helicopter, press [LAT] to enable offset input. [L] and [R] is used to move the center of the load to the left or right. Left is shown as a negative value, right is shown as a positive value.
Cabin Config
There is three different cabin configurations available, 14, 16 or 20 seats. A click on the [Cabin Config] button toggles to the next cabin configuration.
Tail No
A click opens numpad for input of tail number. If entered tail number already exists saved value for that airframe will be loaded. Long press saves EWE, ECG X, ECG Y and cabin configuration. To load a saved tail number, click on [Tail no] and enter the tail number in question.
To clear all tail no input, i.e EWE, ECG X, ECG Y and tail no, click to open numpad and press [CLS].
Clear
Long press clears PAX, fuel and cargo and resets to default values; two pilots at default weight and resets PAX Weight to default.
Save
Long press opens save mission dialogue. To save a mission: Mission no autofills but is editable, Name, objective is optional. Date and time autofills but is editable. When set, press Save. To view saved mission, see Mission view.
Numpad
When a button opens a numpad, it will appear close to the button. The numpad has different inputs depending on the buttons characteristics.
Below, two examples of the numpad, fuel input to the left and weight and lateral input for a cargo zone to the right.
CG Graph view
Shows diagram with Longitudinal and Lateral CG at MAUW and ZFW and simulates the CG change during fuel burn. Check if CG is within limits (green area).
If the MAUW or the dotted fuel burn line is within the limits, MAUW is colored green. When outside the limitations it will shift to red. ZFW is green when within limits, and amber or red when outside limits. If needed, go back to the Data Input View and reposition and/or adjust fuel and/or payload.
Note: When MAUW or ZFW is presented exactly on a CG limit, it is possible to experience both green or red color coding. The calculation is more precise than the presented CG-value which is rounded to three decimals. Therefore the color coding is valid.
Tail No’s view
Shows a list of saved tail numbers, including EWE, ECG X, ECG Y and Cabin configuration. Swipe to the left on a saved tail number row to enable the possibility to load or delete that tail number from the list.
Loading a tail number will change view to the Data Input View.
Missions view
Shows a list of saved missions. Mission number, name and the date is shown. Swipe to the left on a saved mission row to enable the possibility to load, view or delete the mission from the list.
Loading a mission will change view to the Data Input View.
To view a mission, select view. This will open the load sheet report for viewing, printing or mailing the report as a PDF-file. To close a load sheet report, return to Missions view via Missions in the upper left corner.
Settings view
Contains general settings and sound settings. Under general settings it is possible to change the Default Crew Weight and the Default PAX Weight. Default Crew Weight and the Default PAX Weight sets the value that PAX weight and Crew weight returns to when pressing the clear button.
How-To View
The How-To View can be printed from the iPad if an AirPrint enabled printer is available within the wireless network. To Airprint, in How-to view, press the button in upper right corner and select printer.
A printable How-to Guide is also available on http://sevenbytes.se
About View
The About View contains support information and disclaimer.
Copyright © 2015 Sevenbytes. All rights reserved.